

caddman has been with deviantArt for 10 years, and I've known him for a large chunk of that time. His deviations have changed over the years because his approach has changed. As a big fan, and a good friend, I had asked him to write this walk through for PM month. I really appreciate him taking the time to do so for us, and I hope you'll learn something as you enter one of caddman's dreams.
(I'm sorry that the photos are so small, but they were too large to include the original size)
Caddman’s Steps Into A Dream
First thing is a theme comes to me in a dream.
Then the dream scape story comes forward.
Next I will locate a background to which at that time will make some Adjustments.

Size: for me as of late my size is 4000w x 3000 h in pixels.
Set the dpi @ 300.
Also at this point will make adjustments in:
I will do this to all the pics for the dreams capes and place them in a folder.
Save as a tiff file...then it’s off to Photoshop...
I always make a copy of the background.
Next I'll add more elements to the dream.
At the same time Photoshop is open and I have IrfanView open, which is a free viewer.
I open my folder of my dream pics and open one in IrfanView.
Then Ctrl + c ...toggle back to Photoshop and paste.
I will set the Opacity of this pic @ around 70%
Then rename the layer...trust me this is a good idea early on in the dream,
for if you have many layers with no name it makes it very hard to make adjustment later on.
When creating the dream I always have balance, color, shadows, positive, Negative shapes in the back of my mind. I like playing with the opacity on different layers this to me adds a magic feel to the Dream.
I often will make copies of the same layer and move then up and down the total Layer stack...adjusting levels, contracts plus using different styles
Here is the steps for my dream pic…stating at the bottom of the layer stack going to the top.
 1
1  2
21. This not my main base pic…but I make this my number one layer at the bottom
2. I then add a new layer…fill with black color…Opacity @ 22%... Blend Mode set to Normal
 3
3  4
43. Now I add the main base picture…remove the areas not wanted and paint the edges and feather with the
smudge tool to blend.
4. Next the Crow layer added with Opacity @ 76% …Blend Mode set to Exclusion.
 5
5 6
65. Skull and texture layer added next with Opacity @ 31% …Blend Mode set to Normal.
6. Add a wing shadow with layer mask and paint… with Opacity @ 19% …Blend Mode set to Divide.
 7
7 8
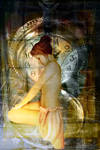
87. A texture layer plus a Woman with veil and wings were added.
Wings Opacity @ 100% …Blend Mode set to Normal.
Woman w/ veil Opacity @ 100% …Blend Mode set to Normal.
8. Two more Women pics were added plus, a painted layer for Veil and dress.
Sitting Woman Opacity @ 65% …Blend Mode set to Normal. Woman front view Opacity @ 99% …Blend Mode set to Normal. Painted layer Opacity @ 80% …Blend Mode set to Normal.
 9
9 10
109. More layers added.
Train tracks Opacity @ 63% …Blend Mode set to Difference. Trees Opacity @ 54% …Blend Mode set to Normal.
Trees Copy 1 Opacity @ 2% …Blend Mode set to Normal…with Bevel, emboss & Drop Shadows.
Trees Copy 2 Opacity @ 13% …Blend Mode set to Linear Burn…with Color Overlay & Gradient Overlay. At this point I am almost finished but need to make some more adjustments to all of the layers.
10. In this step am removing un-wanted Noise, making some overall tone adjustments plus, adjust the fill light/
clarity
 11
11  12
1211. At this time I will save with a new name with all layers intact…in case I ever want to make some changes later on. Then with the copy tiff file will flatten all layers to become one. For I want to make some finishing adjustment s to the whole image.
At this Phase I'm using filters from Nik Software…
Color Stylizer Filter…I use the color picker and choose the color wanted to add to the mood am looking for.
In this case choose a brown hue. Set the contrast Set @ 40% and set Saturation @ 30%
12. Cross Balance Filter…Day light to Tungsten Se t @ 20 % Foliage Filter…helps the green tones in image Set @ 42%
Indian summer Filter…Helps the red tones in the image…Set @ 10%
 14
1414. Polarization Filter…helps the image overall lighting…Strength Set @ 33%
Remove Color Cast Filter…helps with the shadow detail…Color to remove 129… Strength Set @ 33%
<div align="center"
 15
1515. Skylight Filter…helps in the yellow tones…Set @ 13%
White Neutralizer…helps with the overall white tones in the image…Set @ 14% Last step is adding the picture frame…now the dream is over…
I will work on a dream pic on many different sittings...I will place as a wall paper on my
Desk top and will study for a day or two...getting more of the dream to come forward... Then it’s back for more Photoshop to add more touches to make the dream Complete. There is more I do to my dream pic but that is a secret that only my muse know.
If there is anything may want to know...just whistle in your dream.
Thanks so much for the walk through. Now here are 5 of my favorite deviations by caddman.