When I was in school, our life-drawing teacher had us focus on just one area of the model's body as we drew, attempting to form an impression of the rest of that body by staring only at one focal point.
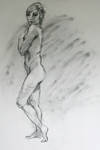
Gradually, the arms and legs would burn into the periphery of what we saw while we were staring at the model's left eye, for example, and it was that peripheral impression we'd try to convey with our stumps of vine charcoal, hopefully resulting in drawings that replicated what we actually saw, as opposed to what a camera might see.
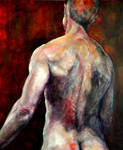
That kind of focus and concentration brings on an easy, trance-like state, and unveils the beauty of human flesh, no matter what shape it's in-- models who would likely never turn up on the cover of Italian Vogue would nonetheless glow under the spotlights of the classroom, and you'd see what a miraculous thing it is for the human body to absorb and reflect light; how that light defines shape and casts differing intensities of shadow. We'd come away from these sessions with a different notion of beauty than the one we'd come in with, because learning how to draw is really about learning how to see…
Most big cities will have a group of artists, somewhere, gathered around a model they've all chipped in a few dollars each to pay for an evenings worth of poses. Just Google "Life Drawing Sessions" followed by the name of the city you live in, to find them. Otherwise, ask a friend to pose for you…
A large tablet of inexpensive, roughly textured newsprint; a bag of vine charcoal; a kneaded grey eraser; one or two large sheets of good pastel or watercolor paper with a heavy texture, and someplace to sit or stand, as well as a wooden horse of some kind to drape your newsprint tablet over, and you're in business.
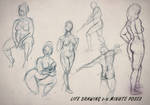
It's smart to warm up with some quick "gestural drawings"-- set a timer for one-minute blasts, and sketch the overall gesture of the model's body, starting from the tilt and inclination of the spine and quickly building out to the head and limbs. Have your model shift poses dramatically at the end of each minute. By the end of 15 minutes worth of these rapid sketches, you'll be ready to increase the timer to 5 minute poses-- more visual information to record, but still the same attempt to gather just an overall impression of the body and its gestures. Then settle the model into a comfortable pose that can be held for half an hour. Try to focus on just one eye, or one ear, of your model, and get your impressions of the entire body down as well as you can while staring from that one determined focal point outward.
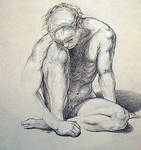
At the end of this half-hour drawing, take a 10 minute break, and then come back with some good, heavily textured pastel or watercolor paper, and take all the energy and lingering impressions from the first hour of drawing into a sustained, hour-long study of the same model…
Whatever your particular artistic outpost is on a daily basis, there's nothing that can recharge your drawing batteries more thoroughly or pleasurably than life-drawing; and it's more addictive than nearly everything else competing for your spare time, too.
ShopDreamUp AI ArtDreamUp
An Overview of Manga Throughout the Years
What is manga?Manga are original Japanese comic books, the name coming from two kanji combined: "man" meaning whimsical or impromptu, and "ga" meaning picture. Over the years, they've evolved into a more sophisticated style of novel, as well as being the basis for anime shows and many video games as well!
Pre World War IIThe history of manga starts in the 12th century with scrolls, which is where the right to left reading style originated.
During the Edo Period (1603-1867), Toba Ehon, a book of drawings embedded the concept of manga was created:
During the late 18th century/early 19th century, manga as a word started being used. Shiji no y
What I learned from my mistakes drawing manga
Anime and Manga week
1. Introduction
In 2009 I took Japanese lessons and next to me was a girl drawing manga characters. I watched her draw and it looked like magic to me, seeing how she made a character appear out of nowhere. This was the key moment in which I decided that I wanted to learn that craft too and create my own characters!
Many manga artists have had similar key moments, for most it was watching their favourite anime or reading an awesome manga or even playing a Japanese videogame. However I have seen many aspiring mangakas give up at the beginner stage, believing they simply sucked at drawing.
I personally think that this is
Soft coloring tutorial for Paint Tool SAI
Tutorial Tuesday
This tutorial was created for projecteducate (https://www.deviantart.com/projecteducate). It covers my general digital art process from start to finish. This artwork was created in SAI, but should be applicable to any digital art software. Some basic steps are omitted assuming the reader is familiar with the basic functions of digital art software.
Otherwise, my inbox is always open if you have any specific questions!
Additional links
Paint Tool SAI tips for beginners
Some basic tips and tricks for Paint Tool SAI. This may be helpful if you are new to the software.
Youtube video
I made a seven-minute video narrating my actions for certain parts of the process
How to create a foggy atmosphere
Photomanipulation Weekend
How to create a foggy atmosphere
This is a small tutorial explaining how to create a foggy atmosphere. I will be using my artwork "The Witch" as reference.
Artwork without fog
First you need a clouds/smoke texture. Preferably one that is larger than your artwork. You could also use the clouds filter in Photoshop (Filter/Render/Clouds) but I prefer a real photo for a more realistic look.
Stock photo (de-saturated)
This is the stock photo that I used. It’s from Deposit Photos, but no worries, we got plenty of excellent ones right here on DeviantART. Here's just a few of them:
Storm Clouds : 01
Storm Clouds
Featured in Groups
© 2012 - 2024 projecteducate
Comments48
Join the community to add your comment. Already a deviant? Log In
Hey, Great article, and I am so flattered that you chose to use my Seki's Back painting to help illustrate it - thank you. Barrie